Exposing Applications on a Private ARO Cluster with Azure Front Door
This content is authored by Red Hat experts, but has not yet been tested on every supported configuration. This guide has been validated on OpenShift 4.20. Operator CRD names, API versions, and console paths may differ on other versions.
Azure Front Door Premium can expose applications running on an Azure Red Hat OpenShift (ARO) cluster while keeping the cluster ingress private. Azure Front Door receives public client traffic at the edge and reaches the ARO internal ingress load balancer through Azure Private Link.
This guide configures the following traffic flow:
Scope and Design Considerations
This guide uses one application hostname and one Azure Front Door origin configuration.
A static origin host header is appropriate when an origin group represents a specific application hostname. If you need to publish multiple OpenShift Route hostnames, use one of the following patterns:
- Create a separate Azure Front Door origin or origin group for each application hostname, with the matching origin host header.
- Place a host-aware reverse proxy between Azure Front Door and the ARO ingress router.
- Disable health probes for a single-origin group only when the loss of origin-health monitoring is acceptable.
Do not configure one shared IP origin with a static host header and expect it to transparently route arbitrary application hostnames. Azure Front Door replaces the backend Host header with the configured origin host header.
Prerequisites
- A private ARO cluster with private ingress
- Azure CLI with the
cdnextension - OpenShift CLI (
oc) - Access to the private ARO API
- Permission to create:
- A subnet in the ARO virtual network
- An Azure Private Link Service
- An Azure Front Door Premium profile
- DNS records for the application domain
- A DNS domain that you control
- An unused subnet CIDR within the ARO virtual network
Install or update the Azure CLI extension:
Log in to Azure and OpenShift before continuing:
Use the same terminal session throughout this guide because later commands reference previously defined environment variables.
Set Environment Variables
Set the ARO cluster, Azure resource group, application hostname, and Azure Front Door names:
Example:
Retrieve cluster and network information:
Confirm that both the API and ingress are private:
Expected output:
Deploy a Test Application
Create a project and deploy a small HTTP application:
Wait for the deployment:
Verify the Route:
Save the Route hostname:
The value of APP_ROUTE must match APP_FQDN.
Identify the ARO Ingress Load Balancer
Find the internal load balancer frontend associated with the worker subnet:
Set the load balancer and frontend configuration names from the output:
Retrieve the ingress load balancer IP and frontend configuration ID:
Validate OpenShift Host-Based Routing
From a system that can reach the private ingress load balancer, request the load balancer IP without a matching Route hostname:
Expected result:
Repeat the request with the valid OpenShift Route hostname:
Expected result:
This establishes the expected router behavior:
Create a Dedicated Private Link Service Subnet
List the virtual network address space and existing subnets:
Confirm that PLS_SUBNET_PREFIX is unused and falls within the virtual network address space.
Create a dedicated subnet for the Private Link Service:
Verify the subnet:
Expected output:
Retrieve the subnet resource ID:
Create the Azure Private Link Service
Create a Private Link Service attached to the ARO ingress load balancer frontend:
Retrieve its resource ID:
Verify the Private Link Service:
Create Azure Front Door Premium in the Azure Portal
This guide uses the Azure Portal to create the Azure Front Door resources. In validation, the equivalent Azure CLI resources were accepted by the control plane but remained at deploymentStatus: NotStarted, and the endpoint returned 404 CONFIG_NOCACHE. Creating the Front Door profile and route through the Portal successfully published the configuration to the Front Door data plane.
The Portal workflow follows this order:
You complete the innermost resource first, then return through each parent form:
Create the Front Door Profile
-
In the Azure Portal, search for Front Doors.
-
Select Create.
-
Select Azure Front Door.
-
Select Custom create.
-
Configure the profile:
Azure Front Door Premium is required for Private Link origins.
-
Do not select Review + Create yet. Continue to the endpoint configuration on the same profile creation page.
Add an Endpoint
-
In the Endpoint tab or section, select Add an endpoint.
-
Configure the endpoint:
-
Add the endpoint.
The new endpoint appears within the Front Door profile creation page.
Add a Route
-
Within the endpoint that you just created, select Add a route.
-
Configure the route:
-
Do not add the route yet. From within the route form, select Add a new origin group.
Add an Origin Group
-
In the origin group form, configure:
-
Do not add the origin group yet. From within the origin group form, select Add an origin.
Add the ARO Origin
Configure the origin:
The two most important values are:
For example:
The origin host header must match an existing OpenShift Route. Do not set it to the load balancer IP. Otherwise, the OpenShift ingress router cannot match the request or health probe to an application Route and returns 503 Application is not available.
- Select Add to finish the origin.
You are returned to the origin group form, where the new origin should now be listed.
Finish the Origin Group
- Review the health-probe settings and confirm that the new
aro-ingressorigin is listed. - Select Add to finish the origin group.
You are returned to the route form, where aro-origin-group should now be selected as the route’s origin group.
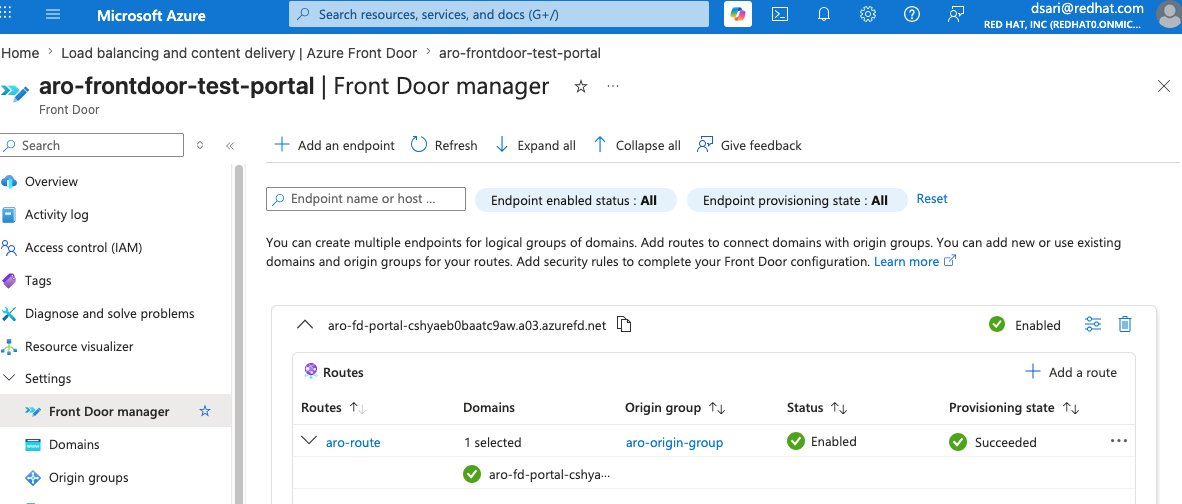
Finish the Route
-
Review the route configuration.
-
Confirm:
-
Select Add to finish the route.
You are returned to the Front Door profile creation page. The endpoint should now show the nested route and origin group configuration.
Review and Create the Front Door Profile
-
Review the profile and endpoint configuration.
-
Confirm that the hierarchy resembles:
-
Select Review + create, if shown.
-
Select Create to deploy the Front Door profile.
After deployment, approve the new managed private endpoint request on the Azure Private Link Service before testing the Front Door endpoint.
Approve the Azure Front Door Private Endpoint Connection
After the Front Door profile is created, Azure Front Door creates a managed private endpoint request against the Private Link Service.
-
In the Azure Portal, search for Private Link services.
-
Open the Private Link Service created earlier.
-
Select Private endpoint connections.
-
Locate the new connection with status Pending.
-
Select the pending connection.
-
Select Approve.
-
Enter an optional approval message, such as:
-
Confirm that the connection status changes to Approved.
A new Azure Front Door profile creates a new managed private endpoint request, even when it uses an existing Private Link Service. Approve each new request before testing the Front Door endpoint.
Allow several minutes for the approved private connection and Front Door configuration to propagate.
Validate the Default Front Door Endpoint
Copy the default endpoint hostname from:
Set it as an environment variable:
Test the endpoint:
Expected output:
Run repeated tests:
All requests should return HTTP 200.
The successful request flow is:
In Azure Portal, check the Origin Health Percentage metric for the Front Door profile after the configuration has propagated.
Configure a Custom Domain
Create an Azure Front Door custom-domain object:
Retrieve the DNS validation token:
Create the required _dnsauth TXT record in the authoritative DNS zone for APP_FQDN.
The exact command depends on the DNS provider. For Azure DNS, set the DNS zone and relative record name:
For example, if APP_FQDN is hello.apps.example.com and the DNS zone is example.com, the relative record name is hello.apps.
Create the validation record:
Check the validation state:
After the domain is validated, associate it with the existing route in the Portal:
Select the validated custom domain, retain the default Front Door domain while testing, and save the route.
Create a CNAME record that points the application hostname to the Azure Front Door endpoint:
Allow time for DNS and Front Door certificate provisioning to complete.
Validate the Configuration
Confirm the OpenShift Route:
Confirm the Azure Front Door origin:
Test the custom application hostname:
Expected output:
Run repeated tests:
All requests should return HTTP 200.
In Azure Portal, check the Origin Health Percentage metric for the Front Door profile. A healthy origin should report successful probes after the configuration has propagated.
Troubleshooting
Azure Front Door returns 404 CONFIG_NOCACHE
A response similar to the following usually means Front Door did not match an active frontend route:
Verify:
- The route is enabled.
linkToDefaultDomainis enabled when testing the defaultazurefd.nethostname.- The route pattern includes
/*. - The incoming hostname is associated with the route.
- The Front Door configuration has had time to propagate.
Do not override the request Host header with an unregistered custom domain when testing the default azurefd.net endpoint. Front Door performs frontend route matching before it contacts the origin.
OpenShift returns 503 Application is not available
This response proves that Front Door reached the OpenShift ingress router, but the router could not match the request to a Route.
Compare the OpenShift Route hostname and Front Door origin host header:
These values must match exactly.
Validate the Route directly:
Health probes return 503
Ensure that:
- The origin host header is set to the application Route hostname.
- The probe path exists.
- The application returns
200 OKfor the selected probe method. HEADis replaced withGETwhen the application does not supportHEAD.
Test HEAD directly:
Only 200 OK is considered a successful Azure Front Door health probe response.
Private Link connection is not working
Check the Private Link Service connection:
The status must be Approved.
A new Azure Front Door profile creates a new managed private endpoint request, even when it uses the same Private Link Service. Approve each new request.
Direct access to the ingress IP times out
The ingress load balancer is private. Confirm that the system running curl still has a valid network path into the ARO virtual network, such as VPN, ExpressRoute, jump host access, or an active SSH tunnel.
A timeout from the client does not necessarily mean the OpenShift Route is unavailable.
Clean Up
Use the Azure Portal to remove the Azure Front Door resources created in this guide.
Delete the Azure Front Door Profile
- In the Azure Portal, search for Front Doors.
- Open the Azure Front Door profile created for this guide.
- On the profile Overview page, select Delete.
- Click ‘Yes’ if prompted.
- Confirm the deletion.
- This may take some time. Wait for the Azure notification to report that the deletion completed successfully.
Deleting the profile also removes the Front Door resources contained within it, including:
It does not delete the ARO cluster, the ARO internal load balancer, the Private Link Service, or the dedicated Private Link Service subnet.
Check the Private Link Service Connection
After the Front Door profile is deleted:
- In the Azure Portal, search for Private Link services.
- Open the Private Link Service created for this guide.
- Select Private endpoint connections.
- Confirm that the Azure Front Door managed private endpoint connection has been removed.
If a disconnected or stale connection remains, delete it only after confirming that the Front Door profile has been removed.
Delete the Private Link Service
- From the Private Link Service overview page, select Delete.
- Confirm the deletion.
- Wait for the deletion to complete.
Delete the Dedicated Private Link Service Subnet
- In the Azure Portal, open the virtual network used by the ARO cluster.
- Select Subnets.
- Select the dedicated subnet created for the Private Link Service.
- Select Delete.
- Confirm the deletion.
Do not delete the ARO control-plane or worker subnets.
Delete the Test Application
Delete the OpenShift test project:
Delete DNS Records
Delete any DNS records created for the test application, including:
Retain the DNS zone if it is used by other applications.